Die Kruger Inc Papierfabrik erhielt zunächst eine Grundierung. Anschließend wurde eine weiße Farbschicht aufgetragen. Nach dem Trocknen wurden Wandelemente entsprechend dem Vorbild abgeklebt und das Gebäude erhielt einen blauen Anstrich.
-
The Kruger Inc paper mill first received a nice coat of primer. I a second step the sidewall were painted white. After the paint was dry some panels were taped and the building was air brushed in the final blue color paint.
Das Dach wurd mit Moosgummi und verschiedenem 800-1200er Schmirgelpapier belegt.
-
The roof was made of modelers rubber and super fine sanding paper.
Um sich ein Bild der Situation in Trois-Rivérèrs zum machen:
-
Prototype in Trois-Riviérès:
Zusammen mit ein paar Loks schaut das Gebäude schon sehr gut aus.
-
The building on the module looked nice with some locos on it.
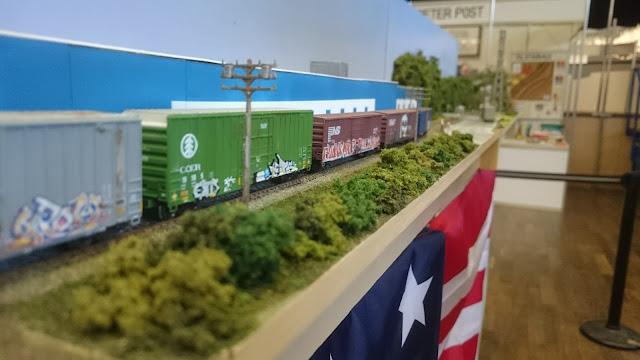
Hier ein paar Fotos von der US-Convention Rodgau 2017.
-
Her are some photos of the us convention Rodgau (Germany) 2017.
In diesem Blog berichte ich über meine Aktivitäten in Spur N - USA. Ich baue meine Module nach der Fremo AmericaN Norm. - This blog is about my activities in N-Scale US model railroading according to the Fremo AmericaN Standard.
Montag, 23. Oktober 2017
Montag, 16. Oktober 2017
Chemin St Simon, Quebec
Unser American-ST Team durfen an der US-Convention 2017 in Rodgau mit einem Oval teilnehmen.
Mehr Informationen gibt es auf der AmericaN-ST Website. Hier beschreibe ich die Vorbereitungen...
-
This year our American-ST team was allowed to attend the US-Convention in Rodgau. More pictures and text at AmericaN-ST Website . Here are the preparations...
Um einen Übergang von Straßenmodul (Kruger Inc) auf Kurvenmodul zu erhalten habe ich mir die eine Szene aus Quebec gesucht und mich daran orientiert.
-
To create a smooth conversation from street modules to non street curves I built a new module and chose a Quebec szene as prototypical orientation.
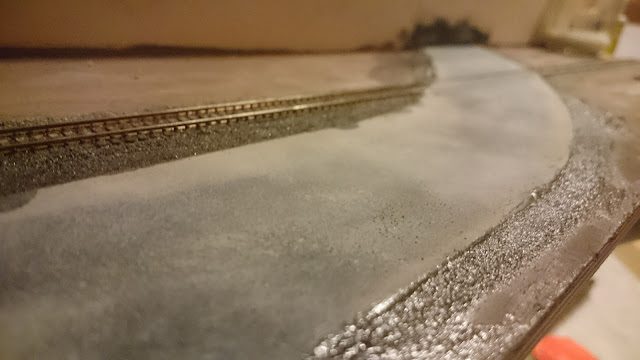
Auf einem 70cm langen ST-Modul wurde ein Gleis verlegt. Anschließend die Straße aus Woodland Scenics Gips gebaut und mit 1000er Schleifpapier bearbeitet.
-
I built a 70cm long ST module and put some Atlas code 55 track on it. Once the track was glues and soldered to the feeder wires I added the road using WS street material. When it was dry, I sanded it with very fine (1000) sanding paper to get a really nice surface.
Im nächsten Schritt wurde das Gleis geschottert, die Straße bemalt und die Straßenschulter ergänzt.
-
The next step was to add ballast and paint the raod with WS asphalt and add some concrete stamps using the swamp methode. Also the road shoulders were added.
Entsprechend dem Vorbild wurde ein Hochspannungsmast positioniert.
-
According to the prototpye a high voltage transmission pole was positioned.
Nach dem begrünen und dem Aubringen von statischen Gras (NOCH) sah die Szene schon sehr realisitsch aus.
-
After applying a base coat of turfs I added some static grass by NOCH with 1.5mm-2mm length.
Die Szene kommt dem Vorbild schon näher...
-
The scene is getting more realism...
Als nächstes brauchte der Hintergrund noch Bäume und dichtes Grün. So wurden WS Super Trees mit NOCH Blättern beklebt.
-
The next step included making some WS super trees with NOCH leaves.
Um die grüne Wand dichter zu bekommen wurde Streumaterial auf Islandmoos aufgebracht.
-
To get a thicker green I put some turf on island moss.
Die grüne Wand hat sich schön ins Gesamtbild eingefügt.
-
The green wall blended in nicely.
Einige Bäume wurde mit NOCH Blättern weiter hervorgehoben.
-
Some Trees were highlighted with NOCh leaves.
Mit Straßenschildern usw. wirkt die Szene schön rund.
-
By adding more details like street signs and power poles the scene is really looking good.
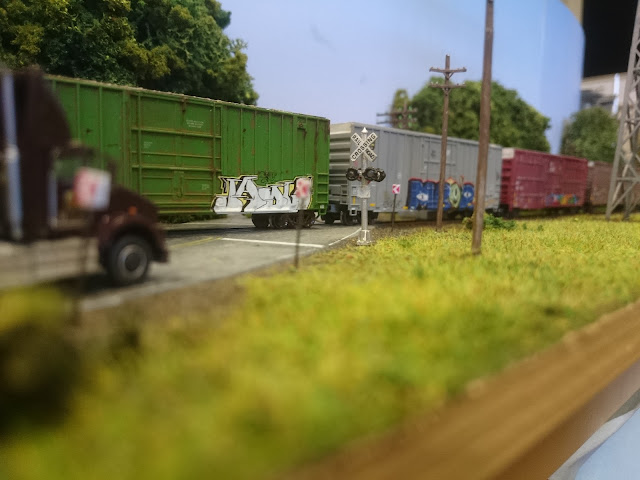
Kein Bahnübergang ohne Zug :)
-
No crossing without trains :)
Ein Bild von der US-Convention Rodgau 2017
-
A picture from the US-Convention Rodgau 2017
Im Detail...
-
In detail...
Remastered by PG:
Donnerstag, 23. Februar 2017
Red Caboose Centerbeam truck corrections
While checking my rolling stock for needed updates (car weight, metal wheels, ride height, body mount couplers, coupler height) I stopped at a Red Caboose Centerbeam.
-
Als ich meine Rollmaterial nach notwenidgen Verbesserungen überprüft habe (Bodymount-Kupplungen, Metallachsen, Wagengewicht, Kupplungshöhe, Wagenkastenhöhe), kam mir bei einem Red Caboose Centerbeam etwas komisch vor.
In the picture that I took during our Canada trip back in 2014, you can see that the trucks of the Centerbeam are farer at the ends of the car. So I searched the internet and confirm that the truck positions on this car are wrong.
-
Auf dem Urlaubsfoto aus 2014 kann man gut erkennen, dass die Drehgestelle am Centerbeam deutlich weiter außen liegen als beim modell.
I removed the metal frame from the plastic and cut both bearings straight.
-
Der Wagenboden wurde vom Kunststoffaufbau gelößt und die Drehgestelllager abgesägt.
I put some UHU two phase power glue on both materials (plastic and metal).
-
Beide Materialen wurden mit UHU Kraftkleber bestrichen.
The bearings were realigned at the first small bolster according to prototype pictures. While glueing I also attached some MTL 1015 modymount couplers.
-
Die Drehgestelllager wurde dann auf Höhe der ersten Strebe entsprechend Vorbildfotos angeklebt. Da der Kleber grade offen war, wurden auch bodymount Kupplungen von MTL Typ 1015 angebracht.
The result with Exactrail Trucks and 36" Wheels.
-
Das Ergebnis mit Exactrail Drehgetsellen und 36" Metallradsätzen.
The ride height was a little bit too high, so I replaced the trucks with BLMA 100ton ASF Trauck with BLMA 36" metal wheels.
-
Die Wagenhöhe war noch etwas zu hoch, daher habe ich die Drehgetselle durch BLMA 100t ASF ausgetauscht (auch mit BLMA 36" Radsätzen).
NICE :)
-
Als ich meine Rollmaterial nach notwenidgen Verbesserungen überprüft habe (Bodymount-Kupplungen, Metallachsen, Wagengewicht, Kupplungshöhe, Wagenkastenhöhe), kam mir bei einem Red Caboose Centerbeam etwas komisch vor.
In the picture that I took during our Canada trip back in 2014, you can see that the trucks of the Centerbeam are farer at the ends of the car. So I searched the internet and confirm that the truck positions on this car are wrong.
-
Auf dem Urlaubsfoto aus 2014 kann man gut erkennen, dass die Drehgestelle am Centerbeam deutlich weiter außen liegen als beim modell.
I removed the metal frame from the plastic and cut both bearings straight.
-
Der Wagenboden wurde vom Kunststoffaufbau gelößt und die Drehgestelllager abgesägt.
I put some UHU two phase power glue on both materials (plastic and metal).
-
Beide Materialen wurden mit UHU Kraftkleber bestrichen.
The bearings were realigned at the first small bolster according to prototype pictures. While glueing I also attached some MTL 1015 modymount couplers.
-
Die Drehgestelllager wurde dann auf Höhe der ersten Strebe entsprechend Vorbildfotos angeklebt. Da der Kleber grade offen war, wurden auch bodymount Kupplungen von MTL Typ 1015 angebracht.
The result with Exactrail Trucks and 36" Wheels.
-
Das Ergebnis mit Exactrail Drehgetsellen und 36" Metallradsätzen.
The ride height was a little bit too high, so I replaced the trucks with BLMA 100ton ASF Trauck with BLMA 36" metal wheels.
-
Die Wagenhöhe war noch etwas zu hoch, daher habe ich die Drehgetselle durch BLMA 100t ASF ausgetauscht (auch mit BLMA 36" Radsätzen).
NICE :)
Montag, 23. Januar 2017
Focus Stacking Results - Part 1
The result after stacking about 90 photos with combineZP.-
-
Das Ergebnis nach ca. 90 mit CombineZP gestackten photos.
-
Das Ergebnis nach ca. 90 mit CombineZP gestackten photos.
Sonntag, 22. Januar 2017
Kruger Inc - Continued
Lange ist der letzte Post her, aber ich konnte endlich mal wieder ein bisschen basteln.
-
It's been a long time since my last post, but finally I could spend some hours working on the layout.
Kruger INC Warehouse built from evergreen metal sidings according to the prototype
-
Die Verladehalle der Papierfabrik Kruger Inc wurde aus Evergreen Metal Siding Profilen nach GoogleMaps Streetview und Urlaubsfotos gebaut.
I started weathering the Atlas telephone Poles with a light grey wash.
-
Die erste Telefonmasten wurden mit einem leichten grauen Wash gealtert.
I also painted some trash containers to add some colour to the scene on module 1.
-
Um auf Modul 1 etwas mehr Farbe ins Spiel zu bringen, habe ich ein paar Container lackiert.
With telehone poles and containers added, the scene started to look more realistic. So I painted an Atlas undec pickup.
-
Mit den Telefonmasten und den Containern nahm die Szene langsam Gestalt an. Da ich sowieso gerade am Lackieren war, habe ich direkt einen Atlas undec Pickup mit bemalt.
The surface of the road didn't look real, so I tried something...
-
Die Straße sah noch nicht gut aus, also habe ich mal was probiert...
I used some car putty to create a smooth road surface.
-
Mit KFZ-Spachtelmasse habe ich eine glatte Oberfläche erschaffen.
But after one day of drying the putty broke.
-
Nach dem Austrocknen ist die Spachtelmasse leider unschön aufgebrochen.
So I sanded it down and created a new street with Woodlands SmoothIT.
-
Also wurde die dritte Straße dieses mal mit Woodlands SmoothIT gebaut.
After sanding with 800 and 2000 sanding paper I applied some primer.
-
Nachdem die Straße mit 800er- und 2000er-Schmirgelpapier bearbeitet wurde, habe ich sie mit einer Grundierung behandelt.
Finally I painted the street with Woodlands Asphalt paint.
-
Endlich konnte ich die Straße mit Woodlands Asphalt-Farbe streichen.
Then I added some grey paint to simulate the road's surface. I applied it with a sponge using a mixture of 2 parts of WS concrete and 1 part of WS asphalt paint.
-
Anschließend habe ich mit einem Schwamm eine Mischung aus 2 Teilen WS Conrete und einem Teil Woodland Asphalt-Farbe aufgetupft.
While painting the lines the masking tape destroyed the paint, so I had to start all over again :'-(
-
Beim Aufbringen der Straßenmarkierungen hat das Malerband leider die Farbe wieder angelöst... Also wieder von vorne :'-(
On module 2 I removed the plastic fall off protection and added some wooden poles instead.
-
Auf Modul 2 habe ich die Kunststoff-Absturzsicherung entfernt und stattdessen Holzpfosten eingesetzt.
Then I applied some brown KNAUFF adhesive.
-
Anschließend habe ich etwas KNAUFF Fliesenkleben aufgetragen.
And finally I applied a mixture of different WS turfs and bushes.
-
Zuletzt wurde die neue Fläche mit WS turfs und diversen Sträuchern geschlossen.
I also removed the protection from module 1 and added some more landscaping.
-
Auf Modul 1 wurde dann auch die Absturzsicherung entfernt und die Fläche begrünt.
Modul 5 received a new street.
-
Auf Modul 5 wurde eine neue Straße gebaut.
Again WS smoothIT was the material of choice.
-
Der Straßenbelag wurde wieder mit WS smoothIT gebaut.
After painting and adding greyish layers the street looked nice. Notice that the "waves" are painted! The surface is absolutely plain.
-
Die Straße wurde wie oben erst mit WS Asphalt bemalt und anschließend mit 2:1 Conrete/Asphalt betupft.
Of course some green was added to module 5, too.
-
Nachdem die Straße fertig war, wurde Modul 5 auch begrünt.
With the same technique I updated the crossing at Module 2.
-
Mit der gleichen Technik wurde auch der Bahnübergang auf Modul 2 überarbeitet.
View from the side with bike lane. At least a gate crossing needs gates. Maybe shapeways has someting useful. I need 4cm length, but the NJ product only has a length of 3cm :(
-
Hier mal ein Blick von der Seite. Es fehlt noch eine Schranke. Vielleicht gibt es ja was bei Shapeways. Ich brauche 4cm Länge, das NJ Produkt hat leider nur 3cm :(
Brough module 1 outside to take some photos in the sun.
-
Habe Modul 1 dann nach draußen gebracht, um mal bei Sonnenlicht ein Photo zu machen.
The Smartphone Pictures were that good that I brought out my DSLR and took some photos for a high quality focus stacking. I'll post some results later...
-
Die Smartphone Bilder waren so gut, dass ich die DSLR rausgeholt habe und mal ein paar Fotos zum Focusstacking gemacht habe. Ergebnisse später...
-
It's been a long time since my last post, but finally I could spend some hours working on the layout.
Kruger INC Warehouse built from evergreen metal sidings according to the prototype
-
Die Verladehalle der Papierfabrik Kruger Inc wurde aus Evergreen Metal Siding Profilen nach GoogleMaps Streetview und Urlaubsfotos gebaut.
I started weathering the Atlas telephone Poles with a light grey wash.
-
Die erste Telefonmasten wurden mit einem leichten grauen Wash gealtert.
I also painted some trash containers to add some colour to the scene on module 1.
-
Um auf Modul 1 etwas mehr Farbe ins Spiel zu bringen, habe ich ein paar Container lackiert.
With telehone poles and containers added, the scene started to look more realistic. So I painted an Atlas undec pickup.
-
Mit den Telefonmasten und den Containern nahm die Szene langsam Gestalt an. Da ich sowieso gerade am Lackieren war, habe ich direkt einen Atlas undec Pickup mit bemalt.
The surface of the road didn't look real, so I tried something...
-
Die Straße sah noch nicht gut aus, also habe ich mal was probiert...
I used some car putty to create a smooth road surface.
-
Mit KFZ-Spachtelmasse habe ich eine glatte Oberfläche erschaffen.
But after one day of drying the putty broke.
-
Nach dem Austrocknen ist die Spachtelmasse leider unschön aufgebrochen.
So I sanded it down and created a new street with Woodlands SmoothIT.
-
Also wurde die dritte Straße dieses mal mit Woodlands SmoothIT gebaut.
After sanding with 800 and 2000 sanding paper I applied some primer.
-
Nachdem die Straße mit 800er- und 2000er-Schmirgelpapier bearbeitet wurde, habe ich sie mit einer Grundierung behandelt.
Finally I painted the street with Woodlands Asphalt paint.
-
Endlich konnte ich die Straße mit Woodlands Asphalt-Farbe streichen.
Then I added some grey paint to simulate the road's surface. I applied it with a sponge using a mixture of 2 parts of WS concrete and 1 part of WS asphalt paint.
-
Anschließend habe ich mit einem Schwamm eine Mischung aus 2 Teilen WS Conrete und einem Teil Woodland Asphalt-Farbe aufgetupft.
While painting the lines the masking tape destroyed the paint, so I had to start all over again :'-(
-
Beim Aufbringen der Straßenmarkierungen hat das Malerband leider die Farbe wieder angelöst... Also wieder von vorne :'-(
On module 2 I removed the plastic fall off protection and added some wooden poles instead.
-
Auf Modul 2 habe ich die Kunststoff-Absturzsicherung entfernt und stattdessen Holzpfosten eingesetzt.
Then I applied some brown KNAUFF adhesive.
-
Anschließend habe ich etwas KNAUFF Fliesenkleben aufgetragen.
And finally I applied a mixture of different WS turfs and bushes.
-
Zuletzt wurde die neue Fläche mit WS turfs und diversen Sträuchern geschlossen.
I also removed the protection from module 1 and added some more landscaping.
-
Auf Modul 1 wurde dann auch die Absturzsicherung entfernt und die Fläche begrünt.
Modul 5 received a new street.
-
Auf Modul 5 wurde eine neue Straße gebaut.
Again WS smoothIT was the material of choice.
-
Der Straßenbelag wurde wieder mit WS smoothIT gebaut.
After painting and adding greyish layers the street looked nice. Notice that the "waves" are painted! The surface is absolutely plain.
-
Die Straße wurde wie oben erst mit WS Asphalt bemalt und anschließend mit 2:1 Conrete/Asphalt betupft.
Of course some green was added to module 5, too.
-
Nachdem die Straße fertig war, wurde Modul 5 auch begrünt.
With the same technique I updated the crossing at Module 2.
-
Mit der gleichen Technik wurde auch der Bahnübergang auf Modul 2 überarbeitet.
View from the side with bike lane. At least a gate crossing needs gates. Maybe shapeways has someting useful. I need 4cm length, but the NJ product only has a length of 3cm :(
-
Hier mal ein Blick von der Seite. Es fehlt noch eine Schranke. Vielleicht gibt es ja was bei Shapeways. Ich brauche 4cm Länge, das NJ Produkt hat leider nur 3cm :(
Brough module 1 outside to take some photos in the sun.
-
Habe Modul 1 dann nach draußen gebracht, um mal bei Sonnenlicht ein Photo zu machen.
The Smartphone Pictures were that good that I brought out my DSLR and took some photos for a high quality focus stacking. I'll post some results later...
-
Die Smartphone Bilder waren so gut, dass ich die DSLR rausgeholt habe und mal ein paar Fotos zum Focusstacking gemacht habe. Ergebnisse später...
Abonnieren
Posts (Atom)
-
There was some progress in 2022! The Beer Store and the blinds dealer were built. Also the first layers of color were applied. Testing the ...
-
The warehouse and the chemicals additives unloading dock were built with evergreen sheets as metal sidings. Also hundreds of woodsticks wer...